Instructions for the magic.

1.THE SPIKED COIN

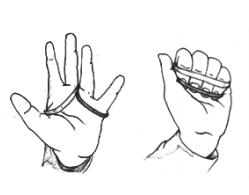
The spiked coin comes with a cylinder (in two parts), five spikes, and the coin. To do this amazing trick, you will need to open the cylinder and place the coin that came with your kit or a real coin into the round section on the bottom of the cylinder, and then cover it with the top. Make sure that the top goes on correctly. You will see a notch in the bottom part that fits into any of the four recesses on the top part. Placing the two parts together like this will ensure that the holes on both the bottom and top part are aligned properly. You are now going to place the five spikes into the holes on the top and they will pass all the way through the coin and out of the bottom of the cylinder! Well, not really! You are going to place the first spike in such a way, that the coin will turn sideways within the cylinder allowing the spikes to pass on all sides of it. Hold the cylinder with the top holes facing you. If the cylinder were a clock, one of the four outer holes should be facing the six o’clock position. Place the first spike into this hole. As the spike touches the coin it will push its outer edge down and force the coin to turn on its side. You will know if this was done correctly if the spike goes all the way through the bottom, and if you can now see all the other bottom holes through the top.You will now place the next spike into the center hole. Then proceed to place all the other spikes into the other holes. After all the spikes are placed, take them out one at a time and then open the cylinder and immediately tip out the coin to show that it is unharmed!
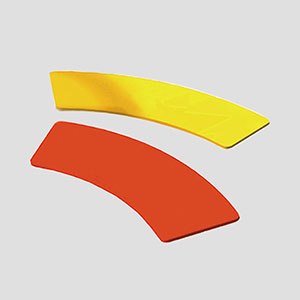
2.PUZZLING BOOMERANGS
This amazing optical illusion will have your audience shaking their heads in disbelief. Place one of your boomerangs on top of the other—you’ll find that they are exactly the same size. When using them in your show, put the boomerangs on the table, one directly above the other. The bottom one will appear to be bigger than the top one. This illusion is so convincing that you may even fool yourself the first few times you try it! Now pick up the top boomerang and pretend to stretch it, then replace it—but under the one still on the table. Suddenly the “shorter” boomerang will appear to be the longer one! You can repeat this a few times to totally confuse your audience. Finish by saying, “Now I’ll make them both the same size!” Snap your fingers over the boomerangs, and then demonstrate that they are in fact the same length by placing one on top of the other!
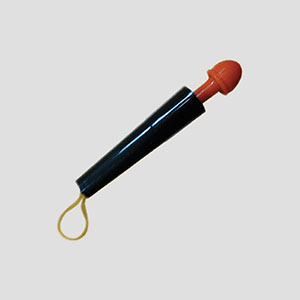
3.SNAP IT
Snap It is a devious little magical prop that is made up of two parts. One is the base. It has a rubber band at one end and a hole at the other. The other part has a round top and a small hook at the bottom. Place the hook end into the base, and try to hook the inside part of the rubber band. Then pull the hook out to see if you did. I bet you couldn’t! That is because the rubber band end on the inside of the base is too short to be grabbed by the hook. But with a sneaky little move you can make your friends believe that it can be done. Here’s how. Place the hook end back in and then using your thumb and first finger pull it back out of the base just slightly. Now, with pressure try to snap your thumb tip and fingertip together, which will make the top snap out from their grip and back into the base. The illusion will look like it snaps back in because there is tension from the rubber band. Of course it is not really hooked onto a rubber band, but your friends don’t know that. The illusion will work even better if you give the top a few turns, before doing the snap. Then you can turn the top a few times, as if you are disengaging the rubber band, before letting your friends try and hook the rubber band!
MAGIC WITH EVERYDAY OBJECTS
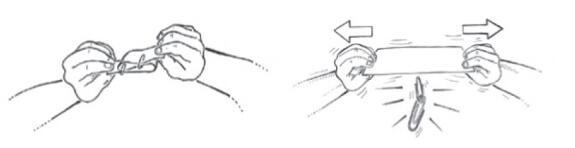
4.THE LINKING PAPER CLIP
For this wild effect, you’ll need two paper clips and a dollar bill. If you don’t have a dollar you can use any currency or a piece of paper. Fold the bill into an “S” shape and clip it together with the open end of the dollar clipped to one side of the inside fold and the other end of the dollar clipped to one side of the other inside fold. Now pull the ends of the paper apart- the two paper clips will fly into the air and link together all by themselves!
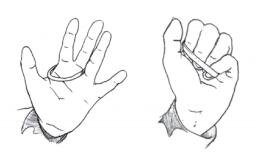
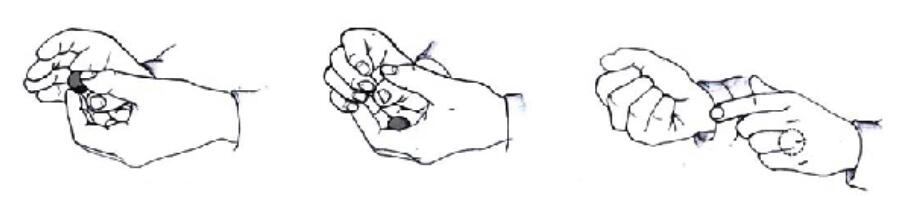
5.THE JUMPING RUBBER BAND
You’ll need, surprise, surprise, a rubber band to perform this neat little effect. Put the rubber band over your first and second fingers. Make sure that your palm is facing you and the back of your hand is toward the audience. Curl your fingers down into a fist, but as you do, pull the rubber band out towards you and slip all of your fingers inside of it, letting the rubber band rest against the bottom part of your fingers, near the nail. From the front where your helpers are watching, it will appear as though the band were around just the first two fingers. Say a magic word and straighten your fingers out. The band will magically hop onto your third and little fingers!
6.THE TRAPPED JUMPING RUBBER BAND
If you twist another rubber band around the tips of your fingers as shown, it will appear as though the first rubber band cannot escape. But, astonishingly, if you perform the moves as you did in the previous effect, the effect will still work! This is a good follow-up to the trick, as you are repeating the trick under even more difficult conditions!
7.DOUBLE JUMPER
Another great follow-up to the previous tricks involves two different colored rubber bands. Put one over your first two fingers and one over your third and little fingers. Close your hand into a fist, fingers towards you, and put all four fingers into both rubber bands. Now, when you straighten out your fingers the rubber bands will change places. This will even work with a third band twisted around your fingertips, as in the trapped rubber band trick, making for a very baffling mystery indeed!
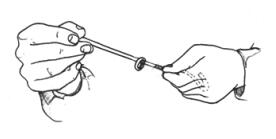
8.RING UP RUBBER BAND
Even a broken rubber band can be used to create magic! Borrow a ring from an audience member and put it on your broken rubber band. Now grip the band in the center with one hand, keeping the rest hidden in your hand. With your other hand, stretch out the band so that it is sloping upwards. The ring should be at the bottom of the slope, nearer to the hand with the hidden portion of rubber band. Now slowly let the band slip between your fingers, releasing the portion you concealed. The ring will creep uphill in a very magical way! The slower you let the band come out from your hand, the slower and more magical the creeping action will be.
9.THE UNBROKEN TOOTHPICK
For this trick, you will need a cloth napkin with hem, and two toothpicks (not included in the set). Before the performance, you need to secretly put one of the toothpicks (toothpick A) into the hem of the cloth. To begin, you will lay out the piece of cloth and place the other toothpick (toothpick B) at the center of the piece of cloth. Now fold the piece of cloth around toothpick B and seemingly hold onto it. In fact, you are secretly holding onto toothpick A in the hem of the cloth while toothpick B is left free inside the cloth. Now ask a volunteer to break the toothpick through the piece of cloth (actually you will let the volunteer break toothpick A inside the hem. Make sure that they confirm that they have broken the toothpick by feeling that it really broken. Now open the piece of cloth and magically show the volunteer toothpick B which is not broken.
10.THE SNEAKY COUNT
Get ten toothpicks and on one of them make a tiny secret mark on both sides so that you can tell this one apart from the others. Make the mark as small as possible with a pencil so that you are the only one who knows it is there. During your show, bring out the ten toothpicks and put them out in a line side by side. Make that your secretly marked toothpick is the first one on the left hand end of the row. That means the secret marked toothpick is on your left, but your audience’s right. Say that you will turn your back and that one of them is to move a number of toothpicks between one and ten, one at a time, from their right to their left end of the row. This means the first toothpick they will move is the secret toothpick. When they have finished, turn back and say, “As impossible as it might seem I’m going to tell you just how many toothpicks you moved!” As you say this, look for your secretly marked toothpick and counting it as ‘one’ count how many there are to the right end (your right) of the row and then tell them that’s how many were moved! NOTE: if the marked toothpick ends up on your far right side, then they moved only one. If the marked toothpick is still on the far left, that means they moved all ten toothpicks!
11.THEE PEPPER TRICK
For this trick, you will need some water, some soap, some regular pepper, a dish (not included in this set). Before the performance, secretly rub soap on your fingers. To begin, put some water in a dish, and then put some regular pepper, Ask a volunteer from the audience to try to separate the pepper and the water by hand. Of course it will be impossible. Now when you put your fingers (with soap) in to the water the pepper will magically separate to the edge of the dish.
12.WATER AND ICE
For this trick, you will need a cup, a wand, a sponge, some water and some ice cubes (not included). Before the performance, place the sponge into the cup at the bottom, and put some ice cubes inside the cup on top of the sponge. You need to find a sponge that will fit well in the cup so that it will not fall out when you tilt the cup upside down. To begin, pour a little bit of water in the cup, wave your wand over the cup and say “Hocus-Pocus!”.The water will be soaked and contained in the sponge. Now tilt the cup and pour out the ice cubes. It appears that you have magically turned the water into ice cubes.
13.COLOR VISION
You will need 5 pieces of paper and a pencil for this trick (not included in this set). Before the performance, you will need to secretly write the words red, yellow, green, pink and blue individually on 5 pieces of paper. Now you need to fold up the 5 pieces of paper separately and place them one in each of your pockets located through out your pant, shirt or jacket. You must remember which written color is in which pocket. To begin, you will ask a volunteer to select one of the 5 colors: red, yellow, green, pink and blue; and think about that color he/she chooses in mind. Ask them what color they have selected; when the volunteer tells you the color he/she selected, you will magically pull the correct piece of paper show the color that he/she chose from one of your pockets. Tell him/her that you had magically predicted his/her chosen color.
14.THE FRENCH DROP
If you want to look like a professional magician you will need to learn some sleight-of-hand. One of the best sleights that a magician can do is called “The French Drop.” With this technique you can make a coin, ball or other small object seem to vanish from your hand. With the left palm up and fingers curled in slightly, hold a coin between your first and second fingers and thumb of your left hand. Now with your right hand, palm down, reach as if you are going to take the coin. Your right thumb goes underneath the coin and your right fingers start to curl around it. As soon as the coin is covered you let the coin fall down into your left hand. Close your right hand into a loose fist and hold it up as your left hand (secretly hiding the coin) drops down to your left side. It is very important to focus all attention onto your right hand just as if the coin were there! You can now slowly open your hand to show that the coin has vanished! As you make it vanish you can sneakily put your left hand into your pocket and leave the coin behind! Make sure to practice this move before trying it on your helpers. You’ll find that watching yourself in a mirror will really help you get all the angles right!
15. UPSIDE DOWN PRESIDENT
Take out a dollar bill. Hold it with the Washington’s head right-side up, so your helper can see it. Fold the dollar bill in half by folding your right side (the audiences left) towards them. Next, fold it in half from top to bottom towards them. Finally, fold it half once more from your right (the audiences left) towards them. Say, “All this folding must be making the president a little dizzy.” Take a look at your dollar bill. If done correctly, the dollar bill’s open end should be on your left, as you look at it. Now, say a few magic words or make a magical gesture and then unfold the dollar bill by sticking your left thumb in between the front and back sides of the dollar bill (on the left) and holding the front side (the part facing the audience) with your thumb and first two fingers of your left hand. Now, with your right thumb and first two fingers, open the back part of the dollar bill (the side facing you) from your left towards your right. From your point of view, the dollar bill’s open ends should now be facing down as well as to your right and you should see an upside down number in the right-hand bottom corner. Now, with the thumb and first fingers of your left hand, hold the back part of the dollar bill (the side facing you) and with your right thumb and first fingers lift up the front of the dollar bill (towards the audience) from bottom to top. After you do that, the dollar bill’s open end should now be facing the right. And you should see two upside down numbers on the right side of the dollar bill. The last step is to take your right thumb and first two fingers and hold the back part of the dollar bill (the side facing you) and use your left thumb and first two fingers to open the dollar bill going from the audiences left to their right. George Washington should now be upside down!
